Unit 34
This was the beginning of learning photoshop skills. The process of this was to cut out the objects and arrange them into a face. I was given 2 files of different fruits and had used the magic tool to cut out these different fruits and arrange them using the move tool, I was able to change the hue of the colours to make it suit my likes of the image colouring.
The main tools I had used were, Lasso Tool, Quick Selection Tool, Magic Wand Tool and Magic Erase Tool. I hadn't had much experience with Photoshop before this so this was all new to me. I was able to do this with the tools we were advised to use. I believe this was a good piece of knowledge to know within the photoshop world because it'll help me build up to what is to come in the future use of photoshop.
What I learned during the making of this:-
• Use the marquee, lasso, and magic wand tools to
select parts of an image in various ways.
• Reposition a selection marquee.
• Deselect a selection.
• Move and duplicate a selection.
• Constrain the movement of a selection.
• Choose areas of an image based on proximity or
colour of pixels
• Adjust a selection with the arrow keys.
• Add to and subtract from selections.
• Rotate, scale, and transform a selection.
• Combine selection tools.
• Crop an image.
After the first part of the photoshop with the fruits, I had moved onto creating a human figure with a egg head using realistic features of a human body. Using the same techniques as before to create an effective photoshop. I also changed the hue of some of the objects, Such as the moustache being blue.
I had taken 2 images and had placed one on top of another. Adding a yellow outer glow to the scarecrow so the outside pixels cannot ruin it. The back ground was also blurred to make it seem like it in the distance.
During this exercise, I was taught about layers and how to combine them to make an effective looking photoshop. I was also taught how to inverse select during the process, it is a very useful tool to be able to do so and will greatly be effective in future photoshops. I was also taught to be able to add layer masks and how to defringe, I was able to create a great looking image that almost looks realistic.
Here I had placed an image and had rubbed out a bit so it would look as if its going towards you. It was a poor choice of images since they both are together as it is.
How to correct the brightness and contrast of an image with the Levels command.
The Photoshop levels option, lets you tweak highlights, mid-tones, and shadows predictably and with absolute authority. During this exercise I was asked to increase this images colour to a much brighter mode as it was very dull and dark. Being able to do this I was able to learn how to increase the brightness of such images and will be able to use it effectively within my work. Playing around with the levels will give me great experience.
I wanted to try out multiple parts of being a different colour and this is how it looks. I like the red because it looks like red mist in the sky and works quite effectively with the blue that is water but doesn't look like natural water obviously.
I like this photoshop of the eye being coloured in. I thought it would be nice to get an eye with quite a pretty pattern and to see how it would look and in all fairness it really does work. This blue is a really nice colour to have used and I like the blue a lot.
To Begin this process I had grey scaled the image before having an overlay of colour to create an awesome effect in which I believe works very well. It works well because of the colours, not just because of the image. The colours is what catches the eye of the audience. With this image, I had selected one part and on accident it had selected other parts. I wanted to see how it would turn when I painted over them like I normally would and to be honest its a happy accident.
Doing this process required a shape of select and to have ctrl and c by then afterwards ctrl v, pasting it and adding effect. Moving the shapes into position to create such a piece.
To create this photoshop required 3 seperate images. I had to select the bottom portion of the road and to feather it all the way down to its edges. I had set the radius to 120 pixels. I then had to drag the road into the the red sky image and in a similar position. Moving on to the moon. I needed to select just about the outside of the moon and to feather it to 12 pixels, then having to move the moon over to the red sky image.
After moving the moon over I had to invert the moon. Having done that I had to match the colour of the moon to the sky. Having done all this, I wanted to have a light source coming from the moon, in which I had to select the area and fill it, changing its opacity to suit its images form.
I added an overlay of a rainbow because I wanted to see how it would venture on towards an effective looking pattern. I had duplicated this pattern multiple amount of times and arranged them into an orderly fashion to create a nice looking pattern.
Here I had cut out part of leaves and rearrange them into a pattern that would look quite good together.
This is an effective poster, during this process of filling the white spaces given. I had given gradient to make it look more appealing. Whereas many had went for bright colours. I had thought it would be quite an effective image with its darkness. I had included overlays of colour of circles and a paint smudge in the background.
Here I had found a simple typography and transformed it to look like the meaning of the word. I had found an image of skin and had selected only the typography (After rasterizing the type) and had pasted special into the selected area. I had also colour dodged and burned to add shadow and light effect to the letters.
This is a image with a texture of iciness but then to have its colour changed to more darkened and for the type to be highlighted so its more ice like looking than the rest for it to standout. As a joke I included Frozen, because it was funny at the time, I added a white outer glow so the pixels around the outside don't ruin the image.
This image would have been more effective with a different metal styled texture in the type. I think I would improve on that the next time.
Fur turned out okay. I am not a big fan of it since it looks really tacky and messy.
For these types I only required to add an outer glow to give such effect and it works very well.
Here I was in a group of three, in which includes myself had been sent to a location and had to take multiple pictures in which would suit well to create this. Having done so, I was able to increase my photoshop skills much more than it has.
Here I had created a really good looking photoshop image, which contains deer, mountains etc. etc. It required all the skills I had learned before this. Mixing all my skills together to create this, definitely improved my skills much more.
During the holiday's I was sent to choose 1 of the 35 photoshop skills to create this. I had used skills I hadn't learn before and turned quite effectively such as the bending of the ground. It took a few attempts to get it how it is supposed to be, but it eventually worked into my favour.
Here is another example as of my skills being mixed together again.
Digital Collage
I believe this collage belongs in the surrealistic art movement. I like this style of art movement because of the aspects within, the fact that it takes on the form of a human but twisted to look nothing like one appearance wise, definitely captures my attention.
For what this person has created seems to have a lot of overlays and multiple amount of images which work effectively together. If you see on his face, you can see that it blends within the mountain in the background. This person may have used lighten or overlay. There are many possible ways he could have created such effect. If I were to create such I doubt I could come anyway near close this persons skill, as much as I would like to I lack experience as this guy looks as if he has done it for quite some time.
I like the colours they have used it may have been hued or colour burned or even the possible saturation but he has created a very well made photoshop with the tools given.
Obviously throughout the creation he has duplicated layers and altered each layer which gives more effects through out the creation.
I like this photoshop because of its realistic nature combined with the surrealism state. The fact that it already has surrealism combined in this photoshop attracts me within an instant. I can clearly see that it is a women with a tattoo, but it definitely isn't a real tattoo.
This must have acquired some overlay amongst other photoshop skills so it can match the shape of the womans hand as well as her face. Using possibly the burn tool and dodge tool it would be quite effective within this sort of photoshop.
This photoshop has caught my eye because of its colours and what consists within the photoshop, in which being an animal and a female. Not just because of what consists of the photoshop its also what they have combined together is what I like most, If you look around the females eye and move around the screen the colours change and it creates quite the illusion, which I love about this piece. I love something that makes you have to think twice about something.
I feel they have used multiple amount of layers and a lot of shapes to create this photoshop. The animal in the back has been grey scaled and filled with colourful champs which makes it stand out quite some amount. Even though its at the back you can easily get distracted by it, which makes it an effective photoshop.
I like this photoshop because of the amount put into it, the amount of colour is very effective as to it all makes into one. The colours don't drown one another, it ties as one. The amount of imagery put within this photoshop piece is quite substantial. I believe is has quite a lot of colour overlay and plenty of blending tools. The phoenix looking orange image in the bottom left is a prime example.
I like this photoshop, I think it works so well with the image it has. To create this isn't so very hard, it requires just to select and place into. Even with its simplicity to make it works very well for what is required. It makes you think how can something so simple be done to look like such a standard and its all the work of photoshop. This photoshop stood out to me because of the positioning of the buildings, its not all about it being done with any old image. They need to work well together and this proves it.
Moodboards of Collages
Own Picture Moodboards
Woodland Collage Photoshop
This is the image I used to create my background, I had to start off by finding a suitable background for my entire collage and it had to be this one because of the way it is set.
It looked quite boring and was missing something and I couldn't quite think what it was, so I decided to cut some of the back ground and move it out a bit to fill the white space a little.
With the sky looking plain, I added some trees and gave it an overlay. It looks very effective within the collage and works well with the colour change etc, since it matches the sky colour.
I duplicated the layer and changed it to saturation, it looks very good because it gives the blue and darker colours a boost and I liked it a lot during the experimenting stage.
I wanted to add some extra and to also to fill the little bit of white space was the dear, I had placed an image within the deer of a scene of deers, I thought i was quite effective with the colour burn effect.
The blue path way is quite the illusion and tricks the mind which is definitely something I love, its to manipulate the mind to thinking that it is a path way when in fact it is another image flipped upside down. So the path way is the sky. The effect we used was lighten.
Where as this image shows the exact image in normal way, no flip but has been set to overlay instead, I like the effect of the circle because it works well with the entire image.
Another circle placement was made, if you can see so slightly below the other circle it still carries on with the trail of the other circle but has an luminosity effect instead of overlay.
We added the sun in but it doesn't look 100% like its not supposed to be there.


Here are 2 possible endings for my final collage, I couldn't decide if I wanted the manipulation of the sky path. Or so keep the circle effect as it is quite effective.
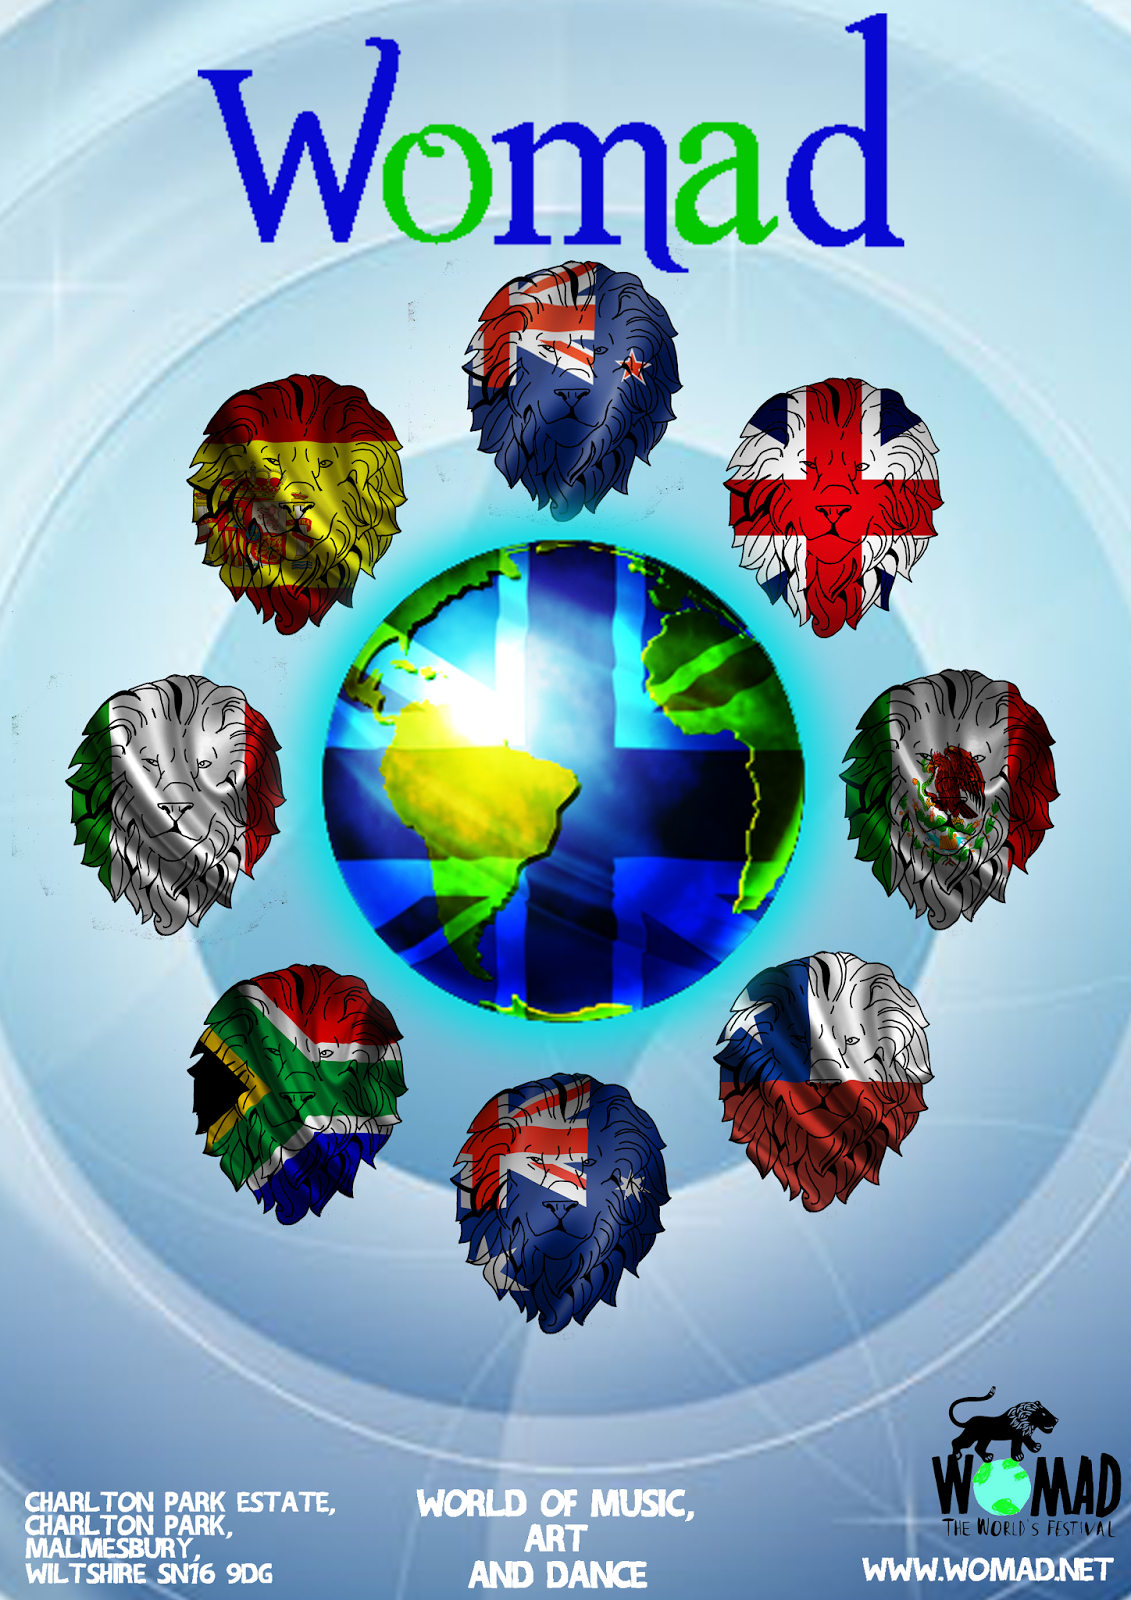
Womad Poster Festival
I like the top left corner poster quite some amount because it definitely reaches out to you, they have clearly developed to test each colour to make the most effective poster. The pattern within the poster is very well done and I would definitely be attracted to such a poster. As you can see the posters have a well made gradient to it, mixing and combining the colours together. I really like that technique because it also blows out to your face.
The poster in the middle top is quite a colour poster and really pops out to your face. It has a very big mixture of bright colours which is a very good way to reach out to someone to see the poster, the only issue with this poster is that the colours contrast and its hard to read the text that it uses. This is a major issue because it causes the reader to not want to read it and you will need many readers.
The poster in the top right is a very effective poster, I like the fact that instead of images and colours it uses typography and colours. The colours they use within the text is an important aspect to the capturing of an audience, I wouldn't want to read a poster if it were purely black and white. The fact that they have used colour within text is very well done. The top of the poster even has some little images which work well with the text and its colour works well with the colour of the text. Overall its an effective poster which I agree I would definitely read.
The bottom left of the poster is an effective poster with its simplicity. It doesn't require a lot to capture the attention of another, just having a creative poster which shows exactly what it is could possibly be enough to capture attention. The only issue it would have is that it lacks information, the lack of information makes the reader unable to gain access to the location of the festival, that is the point of the poster is to give short quick information and to grab attention.
Bottom Middle Poster is an effective poster because of its simplicity within its colours, it doesn't go above and beyond in smashing to much colour in your face hitting you all at once. An effective poster needs 1 single focus point to grab the attention of the audience which will want to make them want to read on. I like the little symbols around the circle, I think it suits it well and fits right in. Nothing in that poster is out of position, it all ties into one effective poster.
The final poster, bottom right being an effective poster in a way. It has some very nice bright colours that do not clash with one another. The use of type is a effective and full of bright colours which work well together even though its a major mix of multiple colours. The lack of white space can be quite an issue within some posters but in this poster it works most effective with its lack of white space, it looks productive and well presented.
General Posters
Top left is an effective poster, which is quite symmetric and contains quite some amount of white space so it isn't over filled with imagery. I like the colours within this poster as they don't drown out the other colours it has. The information has been set out to be in a nice form as it doesn't make it look a mess or over crowded, the font they have used also ties within this subject of a suitable type for this poster. I like how they have added a gradient to the background giving it more depth.
Top Middle is an effective poster in which also has simplicity within it. It has a lot of colour which definitely uses colour in effective way to attract attention. I like how it uses basic outline of a guitar not over doing it with a full coloured one. It works very well because it also gives enough white space for a much more effective poster.
Top right is an okay poster, it isn't really within my fun an games since its over crowded and looks quite messy. The poster is packed with images and typography that there is no white space and no focus points of this poster. For a poster to be effective you want one focus point to grab the audiences attention. Giving too much to look at means they could possibly miss out the important parts of the posters actual details.
Bottom Left Works very well with colour and typography, it works very well together with its white space. The only issue I see is that its sponsor is definitely a odd looking thing to have right in the middle of the page, it really stands out. But I suppose that is supposed to be there.
Bottom Middle is a very busy poster mixed with a lot colours and full of images. I like this poster because of its positioning. The colour rainbow works so well within this poster the type isn't a major aspect within this poster, it wasn't very major so it works more on imagery.
Bottom Right poster is a effective with its simplicity it proves just to how much is required to have an effective poster this is a prime example of a simple poster but works well. Its typography and colours work well with one another.
Visual Recordings
Typography
Development of My First Idea
Here is a beginning of the lion I will include within my work.
I had placed flags, fading away into one another.
I had tested to use water colours, this has given a great effect to my work.
I had done it a second time, tearing it from its page.
I had put my drawing into photoshop.
Adding the shadow effect was a good idea in which I thought would be effective.
I found a textured background suitable for my poster.
Duplicated the layer so it would darker than before.
I decided to add a colour overlay because I thought blue would be more suitable than purple.
Final Poster
Development Of My 2nd Idea
I had drawn an image of a lion
I had put into photoshop to then highlight only the pencil and then cover in black paint, so it will fill with a bold colour.
I had got a image to then place into the lions head.
I added a circular darkness around the outside to have more of effect.
I had tried this with multiple flags.

I stole the world idea from my 3rd idea after producing it and I thought it would be most effective in this poster rather than having just lions.
Final Poster
Idea 3
I had collected a image of the earth, that I think would be suitable to be used to photoshop.
Luminosity Blend Effect
I had added an effect in which made only little change towards the earth but it still does something towards it.
Outer Glow
I added an outer glow of blue as earth has a lot of blue within it and so the glow would make it stand out fairly much.
Flag Overlay/Place Into
I had copied the image of the flag and selected the earth only, having paste special into so that it would only stick within the earths perimeters. I then changed the blending mode to overlay.
I tried it with other flags to see how effective it looks.
Beginning Final Poster
Final Idea
Assignment: Mix Media Collage
Proposal
Artist Critique
Artist research and Critique
Alicia Buelow
Alicia Buelow is a digital mixed media artist who is still
around today. Her work is very well known and has been used in many different
ways such as to create a book cover or for advertisement. Her work consists of
quite natural elements to it such as with is birds, leaves, and its textures.
She doesn’t only focus on these natural elements, she reflects on the
relationship is has with the human anatomy and the technology. In which she
believes is described by every day physical and emotional experiences. Alicia
Buelow is an illustrator and a designer in San Francisco who works with the
traditional media using found objects, digital images, text and possibly
photographs, using these objects and elements to combine into creating a very
well deep texture style work. She has created artwork for many clients in a
wide range of clients she has. Such as websites, book covers, magazines,
software packaging. She works with a wide range of clients.
Alicia contains a lot of old effective techniques used within
her work. She has said she create her backgrounds using painting, drawing,
scraping and gluing images onto a surface. She would often take quite a large
amount of photos to makes the backgrounds fade, peel and have rusted surfaces.
The techniques she would use were hand crafted and then to proceed into
scanning and taken into the digital world to add its other effects. Her work
contains quite an old quaint towards them as the colours she uses within her
work are brown and old alike. Her work is quite deep within the colours and
imagery used within, she uses quite a lot of natural aspects within all her
pieces whether it would contain an animal, plant or an insect of some sort. Her
work consists of quite a dark edgy feel to it but it works so effectively with
its old fashioned background. Her work is styled in a way you wouldn’t
generally see within life, the style is quite surrealistic and reaches but can
also stand quite realistic in the way she produces some of her work.
She uses some text in her work, one of her works contain hope
within it but also contains a crow or raven bird which has a devil’s meaning of
death, the fact that she mixed both hope and death together is out of the
ordinary and makes you wonder what is the meaning of the piece. Even though
they both have different meanings they mix together fairly well.
Some of her work could relate to an older artist like Da
Vinci because of its realistic portrait forms it has within both of them. I
like the fact that her work is also quite old fashioned coloured since of the
effects she has put in within them, but that was the paper back then. They both
relate very well because of the realism they have within them, they use
portraits and realistic forms of animals and anatomy. Da Vinci, studied in the
anatomy for a while within his life and wanted to get the perfect proportions
of it. Alicia too works with anatomy among other things so they can relate on
both subject wise and the style they both aim for.
Alicia works more with applying more images and styles
towards her work. Da Vinci didn’t really look at text as much compared to
Alicia but even then, the style of text Alicia uses within her work is quite an
old fashioned style and is used very effectively.
The techniques she has used within her work is mixed between
surrealism and realistic, she was able to manipulate and combine both imagery,
drawings and styles together to make ones. Her techniques was that she was able
to use different physical media within her backgrounds to give its textures.
She uses glue, paint, drawings and scraping. She would take images and add
effects to them so they would suit the needs of her background and none of it
would stand out of the final piece. She would often blur and overlay some
images she has to add within her work to create the final pieces. In many of
her pieces she would enlarge and decrease the sizes so it can reach the collage
levels of surrealism.
6 General Posters
This is a collage from Alicia Buelow, I find her work very well done because of its style and form. It suits the style I am looking for within my work. The textures she has used are hand made. She uses images she finds and uses them in her pieces. I like how she uses the text within her work, it doesn't stand out from the final collage. I hope to use the techniques Alicia has used such as, painting, scraping, gluing etc. She would then scan her work so it is able to be altered in the digital world.
She uses quite dark colours in her work, there are a few bright parts and it stands out the most which I believe is supposed to. As you can see, hope is quite a visual point noticed fairly quickly when looking at this. You would also see the number on the birds eye before seeing the bird itself.
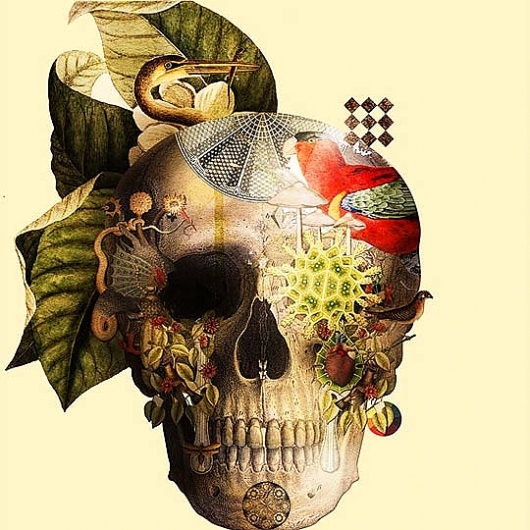
This piece is quite a gothic piece, not because of its colours but because of the imagery it has. The objects this artist has used. I believe this piece is quite surreal and is in the dream like world, it has taken a human skull and adjusted pieces to it as if it was painted/glued onto the object. They have put quite a lot in this piece and works very well, it isn't overly crowded and contains some amount of white space still even with the amount put into it. I particularly like this piece because its quite dark and gothic and that is how I plan to do my final piece.
I believe this collage belongs in the surrealistic art movement. I like this style of art movement because of the aspects within, the fact that it takes on the form of a human but twisted to look nothing like one appearance wise, definitely captures my attention.
For what this person has created seems to have a lot of overlays and multiple amount of images which work effectively together. If you see on his face, you can see that it blends within the mountain in the background. This person may have used lighten or overlay. There are many possible ways he could have created such effect. If I were to create such I doubt I could come anyway near close this persons skill, as much as I would like to I lack experience as this guy looks as if he has done it for quite some time.
I like the colours they have used it may have been hued or colour burned or even the possible saturation but he has created a very well made photoshop with the tools given.
Obviously throughout the creation he has duplicated layers and altered each layer which gives more effects through out the creation.
I like this photoshop because of the amount put into it, the amount of colour is very effective as to it all makes into one. The colours don't drown one another, it ties as one. The amount of imagery put within this photoshop piece is quite substantial. I believe is has quite a lot of colour overlay and plenty of blending tools. The phoenix looking orange image in the bottom left is a prime example.
I like this photoshop, I think it works so well with the image it has. To create this isn't so very hard, it requires just to select and place into. Even with its simplicity to make it works very well for what is required. It makes you think how can something so simple be done to look like such a standard and its all the work of photoshop. This photoshop stood out to me because of the positioning of the buildings, its not all about it being done with any old image. They need to work well together and this proves it.
This collage is quite effective for what it is. I can see that it is army based and contains a lot of army elements within, but the fact you can't 100% see that it is a human under the all the alterations I found it most interesting and attracting. It has a major surreal twist to it, which most collages tend to have because its leading into the dream like world and the unconscious mind.
The colours are quite bright in some sections, I am not sure if they're the perspective points of where the artist wants the viewer to see, I can clearly see that the top is a helmet and due to its brightness and boldness I was able to spot that instantly.
6 My Themed Collages
This collage has quite a gothic and dark theme to it and inspires me quite some amount because of it. It doesn't lack colour though, it may be a dark theme but adding slight colour gives a lot of perspective views. It drags your attention towards it. I am easily able to see that it is a flower on her head. I like this piece because of the colours it has used, I like the dark theme behind it. The imagery used within the poster all mix together to create a well made collage and I hope to do the same in such a style.
The added imagery on the face has some simplicity to it and works well because of that, I don't think I would have the same thoughts if it were fully detailed as it wouldn't leave much white space to create an effective collage.
This collage is effective because of its amount of white space, it isn't overcrowded with objects. It doesn't lack in detail either the bottom of a human head has a major amount of detail and its the off point of the red circle. Once the circle has caught your attention it takes you off to the head and thats how it works. Its effective because even though it doesn't have much to show, it can show a lot and thats what I like about that.

This collage is effective because of the style, it still sticks with the style I aim for and uses real life images mixed with some possible photoshop effects. Using an actual image and turning it to your own. It has the slightest colour and it still stands out the most considering its the smallest part of the main image. Having the slightest colour in a dark scene on the smallest part still able to pull your attention is effective in many ways. Not only the lips are coloured but the eyes in which being another point of where the viewer would look the most.

This collage inspires me the most because of how little is actually shown within this piece. It has a lot more white space than an image itself. It shows quite some fear within the characters expression which is easily seen in such a little space. It has the focus point with the eyes being only in colour and standing out the most. I like the composition of the objects placed on her face and how it looks to fit in the face itself rather than being out of place. The texture on her skin looks quite like a wall and works well with the theme of darkness because of its grundgey, gothic effect.

This collage is quite disturbing to me and I still like such pieces, it has such little colour but still has that colour within it and it is obvious, such as the grundgey green on her cheek, looks as if its a bruise. It is quite a dark collage and would be an addition to the inspiration of my ideas because of its style, it consists of quite fearsome looking creatures on her face. I can't quite tell if the insects are fake or real and thats a good job if it were fake to look real, I wouldn't know myself which I find effective and manipulating. The collage a lot of white space within it and works very well because of it.

This collage is a tad overdone, although it suits my theme because of its gothic nature. I think it contains too much in it, the vinyl in the corners are what pulls me from the focus point of the person in the collage. I do in fact like the text and the person in the piece and this is where I will find my inspiration because of its quite detailed person and the text I find works effectively in this piece because of its gothic style, it suits the theme and works well together. The background has quite a watercolour effect to it and sticks with the gothic theme which I am working towards in being inspired by.
Phobias
A few phobia's I had found.
Ablutophobia- Fear of washing or bathing.
Acarophobia- Fear of itching or of the insects that cause itching.
Acerophobia- Fear of sourness.
Bacillophobia- Fear of microbes.
Bacteriophobia- Fear of bacteria.
Ballistophobia- Fear of missiles or bullets.
Cacophobia- Fear of ugliness.
Cainophobia or Cainotophobia- Fear of newness, novelty.
Caligynephobia- Fear of beautiful women.
Decidophobia- Fear of making decisions.
Defecaloesiophobia- Fear of painful bowels movements.
Deipnophobia- Fear of dining or dinner conversations.
Ecclesiophobia- Fear of church.
Ecophobia- Fear of home.
Eicophobia- Fear of home surroundings.(Domatophobia, Oikophobia)
Febriphobia or Fibriphobia or Fibriophobia- Fear of fever.
Felinophobia- Fear of cats. (Ailurophobia, Elurophobia, Galeophobia, Gatophobia)
Francophobia- Fear of France or French culture. (Gallophobia, Galiophobia)
Galeophobia or Gatophobia- Fear of cats.
Gallophobia or Galiophobia- Fear France or French culture. (Francophobia)
Gamophobia- Fear of marriage.
Hadephobia- Fear of hell.
Hagiophobia- Fear of saints or holy things.
Hamartophobia- Fear of sinning.
Iatrophobia- Fear of going to the doctor or of doctors.
Ichthyophobia- Fear of fish.
Ideophobia- Fear of ideas.
Japanophobia- Fear of Japanese.
Judeophobia- Fear of Jews.
Kainolophobia or Kainophobia- Fear of anything new, novelty.
Kakorrhaphiophobia- Fear of failure or defeat.
Katagelophobia- Fear of ridicule.
Lachanophobia- Fear of vegetables.
Laliophobia or Lalophobia- Fear of speaking.
Leprophobia or Lepraphobia- Fear of leprosy.
Macrophobia- Fear of long waits.
Mageirocophobia- Fear of cooking.
Maieusiophobia- Fear of childbirth.
Nebulaphobia- Fear of fog. (Homichlophobia)
Necrophobia- Fear of death or dead things.
Nelophobia- Fear of glass.
Obesophobia- Fear of gaining weight.(Pocrescophobia)
Ochlophobia- Fear of crowds or mobs.
Ochophobia- Fear of vehicles.
Pagophobia- Fear of ice or frost.
Panthophobia- Fear of suffering and disease.
Panophobia or Pantophobia- Fear of everything.
Radiophobia- Fear of radiation, x-rays.
Ranidaphobia- Fear of frogs.
Rectophobia- Fear of rectum or rectal diseases.
Samhainophobia: Fear of Halloween.
Sarmassophobia- Fear of love play. (Malaxophobia)
Satanophobia- Fear of Satan.
Tachophobia- Fear of speed.
Taeniophobia or Teniophobia- Fear of tapeworms.
Taphephobia Taphophobia- Fear of being buried alive or of cemeteries.
Uranophobia or Ouranophobia- Fear of heaven.
Urophobia- Fear of urine or urinating.
Vaccinophobia- Fear of vaccination.
Venustraphobia- Fear of beautiful women.
Verbophobia- Fear of words.
Walloonphobia- Fear of the Walloons.
Wiccaphobia: Fear of witches and witchcraft.
Xanthophobia- Fear of the color yellow or the word yellow.
Xenoglossophobia- Fear of foreign languages.
Xenophobia- Fear of strangers or foreigners.
Zelophobia- Fear of jealousy.
Zeusophobia- Fear of God or gods.
Zemmiphobia- Fear of the great mole rat.
Zoophobia- Fear of animals.
Visual Elements
Before
After
Before
After
I took a texture and pulled it over to photoshop to then be edited into something I want it to look like, Its a useful technique being able to change a colour of a photo, to make it your own with the colours you want in my piece.
Here is a spider I had drawn, I feel like it would suit my theme because of its fear. Many people are scared and/or fear these sorts of creatures. Due to its abnormal 9 eyes and 8 legs, they aren't the prettiest looking insects around. They have known to possibly kill people, depending on which sort of spider you come across.
I had drawn the grim reaper because many people fear death, death is quite dark subject and many people do not wish to meet such. I thought it would be suitable because no one really wants to die, its quite a big fear depending on what you are doing. Some activities can cause death and that's what people fear the most about it. I used watercolour pencils because it gives a very good effect to it.
Few darkish texts I had done.
I tried to represent heights but it didn't turn out 100% well because I found it difficult to show that it is a height.
Life and Death, not only do people fear death but some people fear life. Life is full of many trips, dangerous and good, people fear to live on because of being bullied or so and it brings them back to death.
My personal fear is that I will fail in my educational years and not succeed in what I am wanting to become, I do not wish to fail. I fear that if I do I will never live the life I really want. To get that life I will need to work hard in my educational years and become successful from the teachings of my teachers.
I got a texture of my own, I thought it would be a nice addition because of the pattern of it.
This texture is also one of my own, I found that a tear it quite dark and would suit my final collage because of the theme I am heading towards.
Few inspiration images I found from ze googles.
Idea 1
I began my idea by drawing a half female and half skull design. I felt that life and death could be in one as a fear. I attempted to give it a tear effect when the skull and face merge together.
I added a bit of a water colour effect to see how it would turn out, it was a trail and error part and it turned out well.
Well enough that I transferred it from paper to photoshop, I deleted the paper in the back ground but I wanted to leave some remaining because I felt that it would look fairly effective because I was going for the tear effect with the skull and face.
I duplicated the layer to make the outlines and color a bit darker and more visable to see.
I added a paper texture and applied the blending option of overlay.
Final
Like Alicia Buelow I included some text because I thought it would be fairly effective. I didn't want it to be 100% bold and stuck out because I didn't want it to be the focus point.
Final Idea 2
I began my 2nd collage by using images I found surfing the web. I thought it would be a good idea to see as I have done an idea that is physical. The image is a picture of a skull, which is a image of death in my eyes. I used this is image because it represents thanatophobia, in which meaning fear of death. This works with my collage theme because I am looking at fears.
Tools Used: Gradient Tool
I added a circular gradient to the outside, I stuck with quite a dark theme because of the nature of fear isn't the brightest feeling in the world. Fear is something you never want to see, adding the darkness gives the image more of a focus point on the skull itself.
This is a scene I used within my collage. It is a representational concept art on hell, hell has its own phobia called hadephobia. I thought hell would be quite a good idea to add within my collage theme. I went for quite a dark and gothic style and this suits the scene.
I set the blending mode to colour because it was most effective and didn't show to much of the hellish outline to pull the attention from the skull.
I added the scene as an overlay on the skulls face, I thought it was quite an effective scene because of the colours. The colours represent quite fire theme to it which is also quite a hellish thing.
A spider, so simple and small but has quite an effect on many people. People fear these insects because of their abnormal figure of 8 legs and 9 eyes, they're crawling style and such. The fear of spiders is called Arachnophobia, I thought it would be pretty cool to include these fear within because its one I thought of first when I hear fear. I don't fear spiders myself.
I included the spider crawling from the dark space of the skulls mouth, I had to erase some bits of the spider to give the effect that the spider is actually with the skull its self. I added a few effects to the spider to get its realistic form that is with the skull.
Colour Overlay
I added a dark red overlay on the spider so I can mix the colours with the colours of the hellish overlay, I needed it to match its similarities to get the effect of it being a part of the skull.
OuterGlow
The outer glow was required because the outline had quite a whitish colour around it and made it stand out from the skull, adding the outglow works effective with it because I was able to get it to blend with the skull.
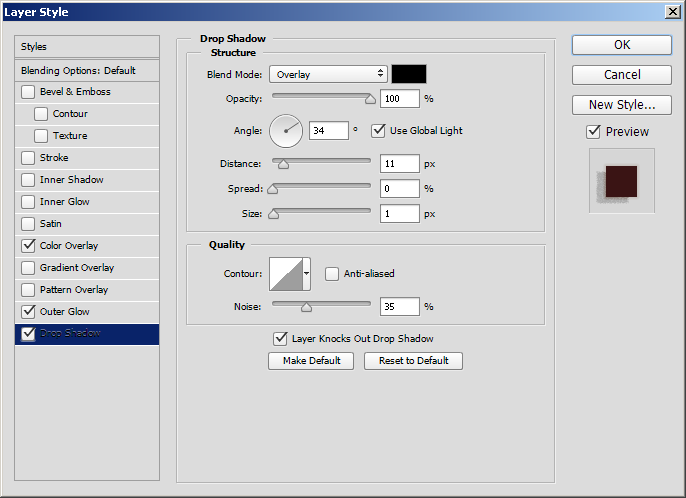
Drop Shadow
I added a drop shadow to the spider because I wanted to give it some sort of 3Dness towards it and show some light within the collage.
I got a web looking image which doesn't look 100% like a web that was what caught my attention I thought it would add quite a great texture to it all.
I like the effect the 'web' has given towards the skull. It looks as if it has a crack within it. Although there is no phobia of the webbing I thought it would be a cool texture to add on top of it all. I set its blending mode to overlay.
A bullet with some nice colour effect to the wind trial behind it. I liked the look of this image after I research into more phobia's that I could use within my collage and found fear of bullets in which being called ballistophobia which is also a fear of missiles.
I added it trailing through the skulls inner mouth area of the black. I thought it would be quite a cool effect to go through it, I erased the middle section so it doesn't look out of place. I set the blending mode to colour dodge and then duplicated a few times to get the brightness up abit.
Single bullet
Double bullet
Triple bullet
Possible Colour Effects of My Final Idea
I wanted to try out what the other possible, I changed the colour overlay of the hellish land.
Blue
Dark Blue
Green
Purple
Yellow
Red
Final
Design Report
To create this collage I have finally created, I had
to research in great detail to get the collage techniques as well as techniques
required to create an effective poster needed to create my final piece in both
my collage and womad poster.
I began looking at recent posters used for womad
itself to gain an image of what images and techniques they use within their
posters. I had realized they use quite colourful and bright colours as well as
their mascot being a lion. Finding this research has proven effective because I
have learned as to what I should add within my womad poster. I found some key
elements that I could possibly use within my posters such as patterns from
other cultures, flags and other womad mascot themed images such as a lion head
or their text styles. I found a few possible types and created my own types as
development of which sort of type style I should have created I found this an
effective way to create an original poster of my own.
I moved on to use images from the web and create them in
my own way combining 2 images together, I used a drawing and used a flag from
the web and pasted into the head of my drawing, I added some shadow effects to
get its full quality. In the end I wasn’t 100% happy with this idea and so I
decided to create a few planets with the same techniques, which I preferred
over the lion head. Although it didn’t have the womad mascot it still had the
womad feel because of the bright colours and the theme about the worlds
festival. I liked the texts I used within my posters; they were so simple but
fitted in each way 100%. My final poster was inspired by my 2nd
idea, which I thought would be quite effectively until I tried the planets
instead which, I preferred more. To create the planets with the flags I only
had to paste special into and change its blending mode.
In my collage research I began looking at an artist
called Alicia Buelow. Her work was quite an inspiration on my work because of
the gothic style; her work was quite dark and suitable for my needs within the
collage world. I had to create a collage that would represent me, I thought of
college first because of my fear of failing and not being able to reach my goal
and at that point I decided to do a collage on fear, not just my own but all
fears in general. I found it deeper to represent me because fear isn’t the
brightest thing in the world, I felt that the darkness I like within many
styles suits me and represents me quite some amount
Through out I collected images from unknown artists
and some from quite known, doing this would help more into my research of what
I could possibly use within my collage. I even searched for collages that have
the same theme as mine, which was a great inspiration to my work.
Since I didn’t only want to do my fears but fears in
general I did a bit of research in finding some other fears, I found some quite
odd fears and others quite interesting. I stuck to fears that were quite dark
and mysterious such as Arachnophobia (Fear of Spiders), hadephobia (Fear of
Hell) and Ballistophobia (Fear of Bullets) these are a few that consist within
my collage ideas.
After doing some research on some fears, I then moved
on to draw and create some of my visual elements that I would include within my
collage; I used a watercolour technique because of its visual style that it
gives. Many were possibly effective in my work others not such as the heights,
it didn’t represent me as much as the darkness of death or hell or so, they
both quite represent my interests in the hellish life. I created some of the
textures using wall pictures I had taken and then transferred to photoshop for
development and then included some interesting colour overlays because I wanted
to see how it would look in some colours that I found would look fascinating
and would approve to be in my collage.
I decided to create an extra moodboard of
inspirational images that represent some fears and some grungy textures. Doing
this I was able to gain a large amount of inspiration that could be used within
my final collage.
I had created three different womad posters, which I
thought would be fairly effective to use as an actual poster for their
advertisement. I mainly looked at using their womad lion and planets because of
their motto of being a festival around the world, using a planet was effective
to use in getting the message across that it is indeed a worlds festival.
I began drawing my own lion and filling it with flags,
it took 2 attempts to get the lion style and flag style within to reach my
standards of an effective womad poster. The womad colour texture I had found
wasn’t to my sort of style I wanted to go for quite and planet styled colour of
which would contain either green or blue, I found that blue was more
astatically pleasing to myself because of its peaceful nature to it and its
colour stood out quite a bit. I stuck with quite a simple
My idea began with one of my drawings that I created;
I liked the idea of life and death because both contain fears within them. I
had drawn a half skull, half women with a paper tear going through their faces
to split them off a little. Through the process of getting rid of the paper in
the background it had left some residue of the paper, I decided to keep that
within the collage because after all it turned out to be quite effective in my
collage final. I got my inspiration from Alicia Buelow through the including of
the text, I had chosen quite a death like type style, doing so had proven to be
useful and actually goes well with the combination of my final collage.
I added a texture image to it, which gave it quite,
and old effect, I had set an overlay to give it the same colour styled paper
Alicia uses because I found her work very inspirational with the style of work
I am producing.
After using drawings of my own, I learned that Alicia
also takes images from other sources and uses them in her own way. I thought it
would be effective to have developed collages using different sources, one
being my own and another being images found. This concludes onto my second
idea. In my second idea I used around 5 images I found that would be suitable
for my collage idea, in which being mainly based around the fear hadephobia,
arachnophobia and ballistophobia. None of these fears actually represent me but
the style behind it does. I like the dark grungy feel a collage can give; I
like the style that people don’t tend to want to look at for a while. I began
my collage by taking a skull that represents death in a vast amount. Using
techniques I had used in previous learning’s of photoshop techniques I added a
simple black gradient, this will create a bit of white space making the skull
quite a focus point. In a collage it is effective to have a bit of a focus
point. I then included an overlay image of a representational theme of hell. I
had pasted the image into the skull’s face so it wouldn’t overlay on anything
else, the outline of the image details didn’t show and gave the skull some
colour of hell which I thought was quite an effective happy mistake as I was
still interesting in its design. Including more fears into the collage was
difficult because I didn’t want to over fill the collage and make it look quite
a mess.
I decided to include a spider, which is a fear of
many. I used many effects to it such as outer glow, drop shadow and even a
colour overlay because I wanted the spider to match the colour theme of the
image behind which being a hell filled skull. I had to position it in an
effective area so it doesn’t look out of place. After placing the spider in a
few places I found an effective area of darkness where the spider can appear
out, which is a space between the skulls face. I had to rub out using a lighter
eraser so it fades out rather than being bolded out. I learnt to do this by a
photoshop technique using a cockroach and a cup of coffee.
I wanted to include a simple texture over everything,
what better than something that entices with the spider. A web, I found a web
that had quite a grungy effect to it and I thought would be suitable to mix
with my collage. I overlaid it all to get its full effectiveness.
I wanted to include something else but wasn’t 100%
sure what it was I should include, I went back to the fears I had looked at and
looked for a few images until I found a bullet with its after smoke leaving an
interesting colour. I tested out as to how I could place this fear within my
collage and found a suitable place after gaining a bit of inspiration from the
spider crawling from the gap between the skulls face. I used the same effect as
I did with the spider, rubbing certain sections out and using a brush I had
downloaded so the end of the bullet smoke isn’t a dead end but looks as if its
still travelling.
I moved on to try out some other possible overlay
colours I could have used to finish it off but I decided to stick with my
original.
I learned creating my womad poster was using different
blend options and effects to be used within the posters. As the first design of
my poster as a drop shadow I thought it would be effective for it to look quite
3D and stand out. Throughout the learning of my photoshop practices I was able
to create a poster and a collage quite effectively. By doing so in the
practices at the start I was able to use my skills to a higher standard than I
had before, If I were to try doing what I did now without any of the techniques
I was taught I don’t think I could create such posters and collages we had
created throughout. Using photoshop as my main software was quite a great
experience because I was able to use the techniques I used within this unit and
use them effectively in other units I wouldn’t have thought using in that part.
I found that many techniques were quite difficult to
use within certain sections of creating such as some techniques can’t be used
with other ideas as they do not 100% work with that sort of style. I enjoyed
the creating and finding textures for the backgrounds quite some amount because
of the effects I can use to change its colours or to make certain sections of
that texture to stand out. I also enjoyed being able to use paste into special
because it was proven to be effective in both of my collage and womad works.
My experience with photoshop has been a working
progresss, which I have enjoyed quite a lot. The more I learned the more I
enjoyed using the effects in my final pieces throughout the course not only
being able to use it in this unit but also being able to use it within other
units.
I enjoyed creating this collage because of the theme
it had, it had all my specific interests, I felt it was created to quite a high
standard considering I had used images I found, it still is quite an effective
collage and sticks to its theme of fear, since fear is a dark side to everyone.
It’s not something people generally wish to talk about and it’s quite a grungy
thing to have. If I had another chance to create something similar, I would
definitely have a go at using my own images as well as possibly using images I
found as well, mixing both together. I also enjoyed creating the womad poster
even thought it doesn’t 100% represent me, it has a totally different theme
compared to the collage I had but I still enjoyed the creation of it, I was
able to create an effective poster as well as collage. In the poster I was able
to use both images I created and images I found from the Internet and used them
together to create an effective styled poster which I thoroughly enjoyed
creating.
I believe my work is quite too a high standard
although I wouldn’t say its my work is to a Alicia Buelow standard I believe
that it was possibly reaching that point. I believe my work all as one could
get a distinction because of the amount of experimentation I had used
throughout. The processes I have learned from nothing has been used to an
effective standard of what I am creating now. From the beginning I didn’t know
a thing about photoshop, all I could do was cut and paste pictures. Throughout
I was able to use many different techniques photoshop has to offer such as
blending options, effects, and its different tools. I even went on to finding
guides on how to use other techniques not taught such as, being able to
cartoonize an image.
Both my posters, collage and learnt techniques have
been created to quite a high standard of which I believe is backed up with a
large amount of research and experimentation to gain the grade destinction.